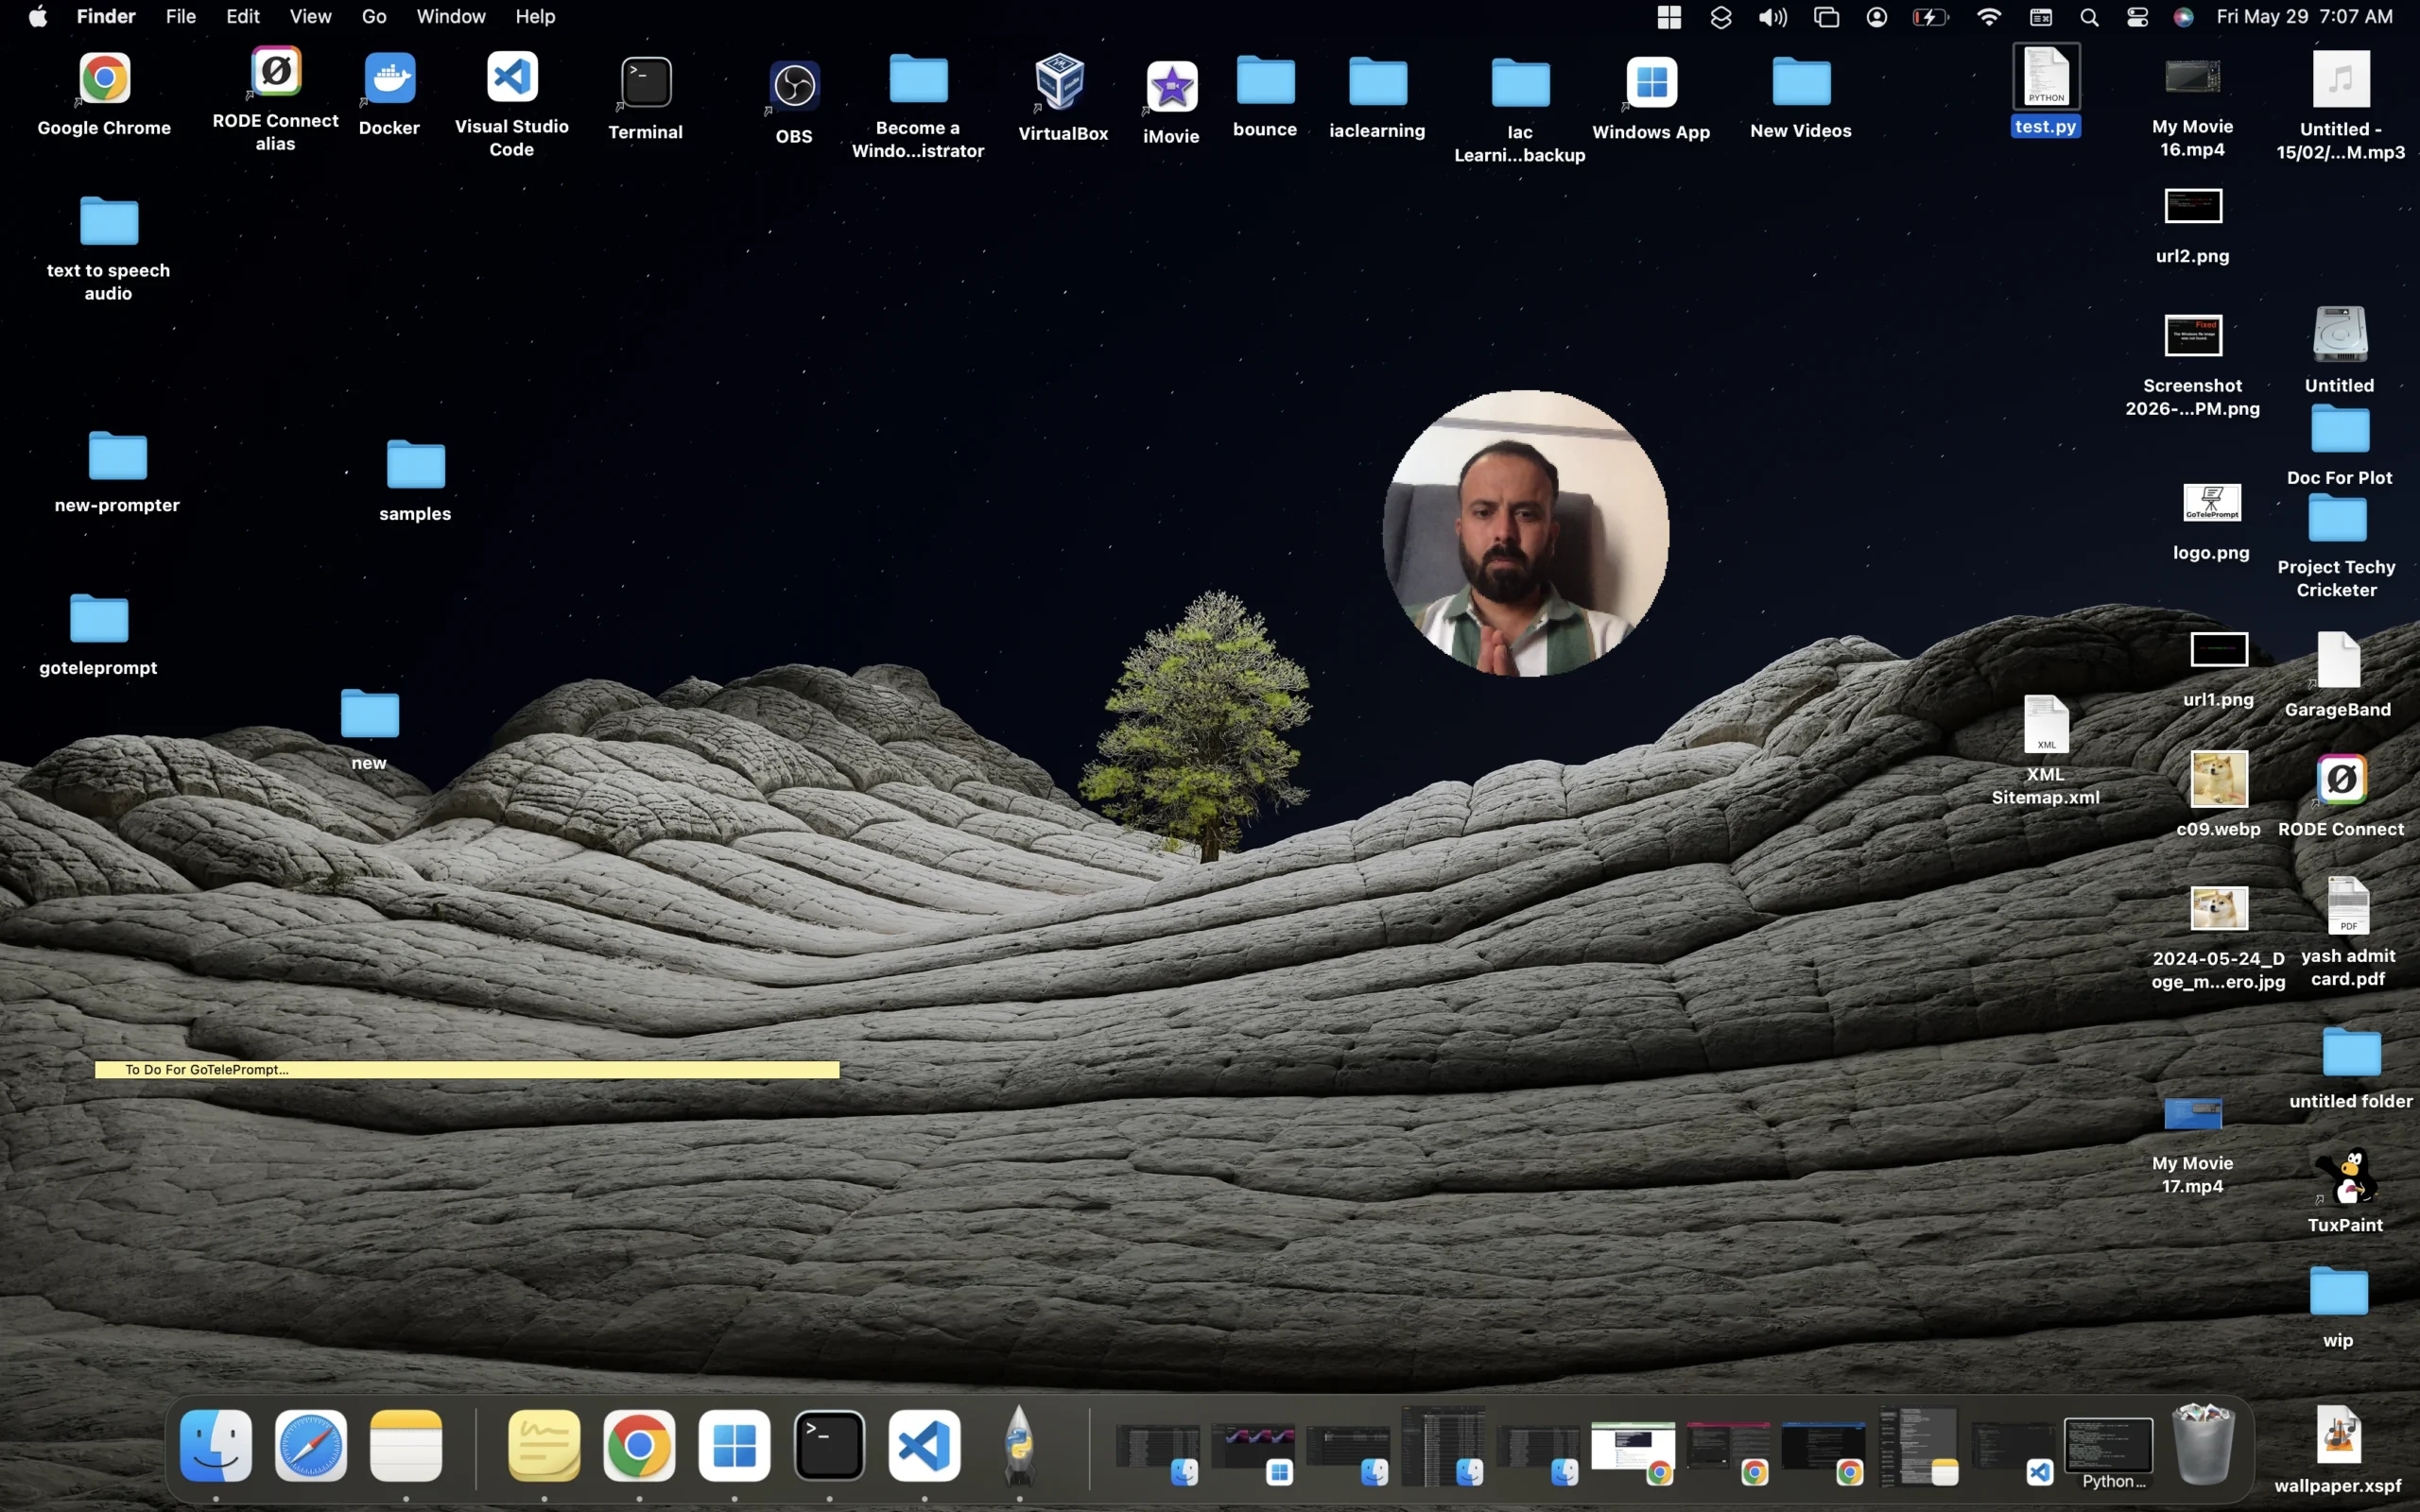
macOS doesn’t give you a floating circular webcam out of the box. Here’s a free Python script that puts a draggable circle face-cam overlay on top of everything — no paid app required.
If you’ve ever watched a YouTube tutorial and noticed the presenter’s face appears inside a clean floating circle that sits on top of the screen — that’s not a fancy editor. That’s a live overlay recorded directly into the video.
On macOS, there’s no built-in way to do this. QuickTime gives you a rectangle. Screen Studio (Mac-only, $89+) does it beautifully but costs money. And most “solutions” you’ll find online just tell you to add the circle in post-production — which means syncing two recordings and still not getting a draggable overlay during the actual recording.
This guide gives you a working Python script that creates a frameless, always-on-top, circular webcam window you can drag anywhere on your screen before you hit record.
What You’ll End Up With
- A perfect circle showing your live webcam feed
- Floats above every window (browser, slides, terminal — everything)
- Draggable anywhere on screen by clicking and dragging
- No borders, no title bar, transparent background outside the circle
- Works with any screen recorder — QuickTime, GoTelePrompt, OBS, or anything else
What You Need First
You only need Python 3 and two packages. Open your Terminal and run:
pip install opencv-python PyQt5The Script
Create a new file called floating_webcam.py and paste this entire block in:
import sys
import cv2
import math
from PyQt5.QtWidgets import QApplication, QLabel, QWidget, QPushButton
from PyQt5.QtCore import Qt, QTimer, QPoint, QPropertyAnimation, QEasingCurve, QRect, pyqtProperty
from PyQt5.QtGui import (QImage, QPixmap, QRegion, QPainterPath, QPainter,
                          QColor, QPen, QBrush, QRadialGradient, QLinearGradient,
                          QFont, QFontDatabase)


class RingWidget(QWidget):
    """Draws the animated glowing ring behind the video circle."""

    def __init__(self, parent=None, size=260):
        super().__init__(parent)
        self.size = size
        self.resize(size + 30, size + 30)
        self.setAttribute(Qt.WA_TranslucentBackground)
        self.setAttribute(Qt.WA_TransparentForMouseEvents)
        self._angle = 0
        self._pulse = 0.0
        self._pulse_dir = 1
        self.is_speaking = False  # toggle for "active speaker" glow

    def set_angle(self, angle):
        self._angle = angle
        self.update()

    def set_pulse(self, pulse):
        self._pulse = pulse
        self.update()

    def paintEvent(self, event):
        painter = QPainter(self)
        painter.setRenderHint(QPainter.Antialiasing)

        cx = (self.width()) / 2
        cy = (self.height()) / 2
        r = self.size / 2

        # ── Outer glow shadow ──────────────────────────────────────────────
        glow_color = QColor(99, 179, 237, int(60 + self._pulse * 40))
        for spread in range(8, 0, -2):
            pen = QPen(glow_color, spread)
            pen.setCapStyle(Qt.RoundCap)
            painter.setPen(pen)
            painter.setBrush(Qt.NoBrush)
            painter.drawEllipse(int(cx - r - 2), int(cy - r - 2),
                                int(r * 2 + 4), int(r * 2 + 4))

        # ── Track ring (dim) ───────────────────────────────────────────────
        track_pen = QPen(QColor(255, 255, 255, 25), 2.5)
        painter.setPen(track_pen)
        painter.drawEllipse(int(cx - r), int(cy - r), int(r * 2), int(r * 2))

        # ── Animated arc ──────────────────────────────────────────────────
        arc_rect = QRect(int(cx - r), int(cy - r), int(r * 2), int(r * 2))

        # Gradient-colored arc (cyan → purple)
        arc_pen = QPen(QColor(99, 210, 255), 2.8)
        arc_pen.setCapStyle(Qt.RoundCap)
        painter.setPen(arc_pen)
        # Qt uses 1/16th degree units; start from top (-90°)
        start_angle = int((-90 + self._angle) * 16)
        span_angle = int(220 * 16)
        painter.drawArc(arc_rect, start_angle, span_angle)

        # Second shorter arc, offset
        arc_pen2 = QPen(QColor(180, 100, 255), 2.0)
        arc_pen2.setCapStyle(Qt.RoundCap)
        painter.setPen(arc_pen2)
        start2 = int((-90 + self._angle + 230) * 16)
        span2 = int(80 * 16)
        painter.drawArc(arc_rect, start2, span2)

        # ── Dot at arc head ───────────────────────────────────────────────
        angle_rad = math.radians(-90 + self._angle)
        dot_x = cx + r * math.cos(angle_rad)
        dot_y = cy + r * math.sin(angle_rad)
        dot_brush = QBrush(QColor(99, 210, 255))
        painter.setBrush(dot_brush)
        painter.setPen(Qt.NoPen)
        painter.drawEllipse(int(dot_x - 4), int(dot_y - 4), 8, 8)


class StatusDot(QWidget):
    """Small coloured dot with label — shows REC / LIVE / MUTED status."""

    def __init__(self, parent=None, color="#ef4444", label="REC"):
        super().__init__(parent)
        self.color = QColor(color)
        self.label = label
        self.resize(56, 18)
        self.setAttribute(Qt.WA_TranslucentBackground)
        self._blink = True
        self.blink_timer = QTimer(self)
        self.blink_timer.timeout.connect(self._do_blink)
        self.blink_timer.start(600)

    def _do_blink(self):
        self._blink = not self._blink
        self.update()

    def paintEvent(self, event):
        p = QPainter(self)
        p.setRenderHint(QPainter.Antialiasing)
        # Pill background
        p.setBrush(QBrush(QColor(0, 0, 0, 140)))
        p.setPen(Qt.NoPen)
        p.drawRoundedRect(0, 0, self.width(), self.height(), 9, 9)
        # Dot
        dot_color = self.color if self._blink else QColor(self.color.red(),
                                                           self.color.green(),
                                                           self.color.blue(), 80)
        p.setBrush(QBrush(dot_color))
        p.drawEllipse(5, 5, 8, 8)
        # Text
        p.setPen(QColor(220, 220, 220))
        font = QFont("Courier New", 7, QFont.Bold)
        p.setFont(font)
        p.drawText(17, 13, self.label)


class CloseButton(QWidget):
    def __init__(self, parent=None, callback=None):
        super().__init__(parent)
        self.callback = callback
        self.resize(22, 22)
        self.setAttribute(Qt.WA_TranslucentBackground)
        self.setCursor(Qt.PointingHandCursor)
        self._hover = False

    def enterEvent(self, e):
        self._hover = True
        self.update()

    def leaveEvent(self, e):
        self._hover = False
        self.update()

    def mousePressEvent(self, e):
        if self.callback:
            self.callback()

    def paintEvent(self, event):
        p = QPainter(self)
        p.setRenderHint(QPainter.Antialiasing)
        bg = QColor(255, 80, 80, 200 if self._hover else 140)
        p.setBrush(QBrush(bg))
        p.setPen(Qt.NoPen)
        p.drawEllipse(0, 0, 22, 22)
        p.setPen(QPen(QColor(255, 255, 255, 220), 2))
        p.drawLine(6, 6, 16, 16)
        p.drawLine(16, 6, 6, 16)


class MuteButton(QWidget):
    def __init__(self, parent=None):
        super().__init__(parent)
        self.muted = False
        self.resize(22, 22)
        self.setAttribute(Qt.WA_TranslucentBackground)
        self.setCursor(Qt.PointingHandCursor)
        self._hover = False

    def enterEvent(self, e):
        self._hover = True; self.update()

    def leaveEvent(self, e):
        self._hover = False; self.update()

    def mousePressEvent(self, e):
        self.muted = not self.muted
        self.update()

    def paintEvent(self, event):
        p = QPainter(self)
        p.setRenderHint(QPainter.Antialiasing)
        bg = QColor(255, 200, 0, 200) if self.muted else QColor(255, 255, 255, 50 if not self._hover else 100)
        p.setBrush(QBrush(bg))
        p.setPen(Qt.NoPen)
        p.drawEllipse(0, 0, 22, 22)
        icon_color = QColor(40, 40, 40) if self.muted else QColor(255, 255, 255, 200)
        p.setPen(QPen(icon_color, 1.8))
        # Simple mic icon
        p.drawRoundedRect(8, 4, 6, 9, 3, 3)
        p.drawArc(5, 9, 12, 8, 0, -180 * 16)
        p.drawLine(11, 17, 11, 19)
        p.drawLine(8, 19, 14, 19)
        if self.muted:
            p.setPen(QPen(QColor(200, 0, 0), 2))
            p.drawLine(4, 4, 18, 18)


class WebcamOverlay(QWidget):
    def __init__(self):
        super().__init__()
        self.cam_size = 240          # video circle diameter
        self.total_size = 300        # total widget size (room for ring + controls)
        self.oldPos = self.pos()
        self._ring_angle = 0
        self._pulse_val = 0.0
        self._pulse_dir = 1
        self._controls_visible = False
        self._hover_fade = 0

        self.initUI()

        self.cap = cv2.VideoCapture(0)

        # Frame update timer (~30 fps)
        self.frame_timer = QTimer(self)
        self.frame_timer.timeout.connect(self.update_frame)
        self.frame_timer.start(33)

        # Ring animation timer
        self.ring_timer = QTimer(self)
        self.ring_timer.timeout.connect(self.animate_ring)
        self.ring_timer.start(20)

    def initUI(self):
        self.setWindowFlags(Qt.FramelessWindowHint | Qt.WindowStaysOnTopHint)
        self.setAttribute(Qt.WA_TranslucentBackground)
        self.resize(self.total_size, self.total_size)

        offset = (self.total_size - self.cam_size) // 2

        # ── Ring widget (behind video) ─────────────────────────────────────
        self.ring = RingWidget(self, size=self.cam_size)
        self.ring.move(offset - 15, offset - 15)

        # ── Video label ───────────────────────────────────────────────────
        self.label = QLabel(self)
        self.label.resize(self.cam_size, self.cam_size)
        self.label.move(offset, offset)
        self.label.setStyleSheet("border-radius: {}px;".format(self.cam_size // 2))

        # Clip video label to circle
        path = QPainterPath()
        path.addEllipse(0, 0, self.cam_size, self.cam_size)
        region = QRegion(path.toFillPolygon().toPolygon())
        self.label.setMask(region)

        # ── REC status dot (top-left of circle) ───────────────────────────
        self.rec_dot = StatusDot(self, color="#ef4444", label="REC")
        self.rec_dot.move(offset + 8, offset + 8)
        self.rec_dot.hide()

        # ── Controls bar (appears on hover) ───────────────────────────────
        self.close_btn = CloseButton(self, callback=self.close_app)
        self.close_btn.move(offset + self.cam_size - 26, offset + 4)
        self.close_btn.hide()

        self.mute_btn = MuteButton(self)
        self.mute_btn.move(offset + self.cam_size - 52, offset + 4)
        self.mute_btn.hide()

        # Show REC dot
        self.rec_dot.show()

    def close_app(self):
        self.cap.release()
        self.close()

    def animate_ring(self):
        # Rotate the arc
        self._ring_angle = (self._ring_angle + 1.2) % 360
        self.ring.set_angle(self._ring_angle)

        # Pulse glow
        self._pulse_val += 0.04 * self._pulse_dir
        if self._pulse_val >= 1.0:
            self._pulse_dir = -1
        elif self._pulse_val <= 0.0:
            self._pulse_dir = 1
        self.ring.set_pulse(self._pulse_val)

    def update_frame(self):
        ret, frame = self.cap.read()
        if not ret:
            return

        # Mirror
        frame = cv2.flip(frame, 1)

        # Centre-crop to square
        h, w, _ = frame.shape
        min_dim = min(h, w)
        sx = (w - min_dim) // 2
        sy = (h - min_dim) // 2
        frame = frame[sy:sy + min_dim, sx:sx + min_dim]

        # Resize
        frame = cv2.resize(frame, (self.cam_size, self.cam_size))

        # BGR → RGB
        frame = cv2.cvtColor(frame, cv2.COLOR_BGR2RGB)

        h, w, ch = frame.shape
        qt_img = QImage(frame.data, w, h, ch * w, QImage.Format_RGB888)

        # Apply circular mask via pixmap
        pixmap = QPixmap.fromImage(qt_img)

        # Paint circular vignette overlay
        result = QPixmap(self.cam_size, self.cam_size)
        result.fill(Qt.transparent)
        mask_painter = QPainter(result)
        mask_painter.setRenderHint(QPainter.Antialiasing)

        # Clip to circle
        clip = QPainterPath()
        clip.addEllipse(0, 0, self.cam_size, self.cam_size)
        mask_painter.setClipPath(clip)
        mask_painter.drawPixmap(0, 0, pixmap)


        mask_painter.end()
        self.label.setPixmap(result)

    def enterEvent(self, event):
        self.close_btn.show()
        self.mute_btn.show()

    def leaveEvent(self, event):
        self.close_btn.hide()
        self.mute_btn.hide()

    def mousePressEvent(self, event):
        if event.button() == Qt.LeftButton:
            self.oldPos = event.globalPos()

    def mouseMoveEvent(self, event):
        if event.buttons() == Qt.LeftButton:
            delta = QPoint(event.globalPos() - self.oldPos)
            self.move(self.x() + delta.x(), self.y() + delta.y())
            self.oldPos = event.globalPos()

    def closeEvent(self, event):
        self.cap.release()


if __name__ == '__main__':
    app = QApplication(sys.argv)
    app.setStyle("Fusion")
    window = WebcamOverlay()
    window.show()
    sys.exit(app.exec_())
How to Run It
- Open your Terminal.
- Navigate to the folder where you saved the file. For example:
cd ~/Desktop - Run the script:
python3 floating_webcam.py - A circular webcam window appears. Click and drag it anywhere on your screen.
- Start your screen recorder (QuickTime, GoTelePrompt, OBS — anything). The circle will be captured live.
- When you're done recording, go back to Terminal and press Ctrl + C to close the overlay.
self.size = 300 at the top of __init__ to any number you want. 200 is compact, 400 is large. The circle will scale automatically.How It Works (Plain English)
Here's what each key part of the script is actually doing, in case you want to tweak it:
Qt.FramelessWindowHint | Qt.WindowStaysOnTopHint
This strips the standard macOS window chrome (the red/yellow/green traffic-light buttons) and forces the window to render above every other app — your browser, your slides, your code editor, all of it. Without WindowStaysOnTopHint, the circle would disappear behind your active window the second you click anywhere.
QPainterPath().addEllipse()
macOS windows are always rectangles at the OS level. This line tells the OS to mask the window with an elliptical (circular) region, making anything outside the circle genuinely transparent and click-through — not just visually hidden.
mousePressEvent & mouseMoveEvent
Because we removed the title bar, there's nothing to drag. These two functions recreate drag behaviour manually: they record where your mouse was when you clicked, and as you move, they calculate the delta and shift the window position to match.
The centre crop in update_frame
Webcam feeds are rectangular (usually 16:9). Squashing that into a circle would stretch your face. Instead, the script crops the centre square out of each frame before resizing — so the circle always contains a natural, undistorted view.
Don't Want to Run a Script?
If Python isn't your thing, or you just want something that's ready in 10 seconds without installing anything, GoTelePrompt's browser-based screen recorder includes a built-in circular webcam overlay that works the same way — no setup, no Terminal, nothing to install.
GoTelePrompt Screen Recorder
Free · Browser-based · Works on Mac, Windows, Linux
Pros
- Zero installation or setup
- Built-in circular webcam PIP
- Drag to reposition the facecam
- 4K recording quality
- Completely free
Cons
- Requires an internet connection
- Auto-zoom feature in beta
Quick Comparison
| Method | Cost | Setup Required | Circular Facecam | Draggable |
|---|---|---|---|---|
| Python Script (this guide) | Free | pip install + Python 3 | ✓ Yes | ✓ Yes |
| GoTelePrompt | Free | None (browser) | ✓ Yes | ✓ Yes |
| Screen Studio | $89+ | App install | ✓ Yes | ✓ Yes |
| QuickTime + iMovie | Free | None | ✗ No | ✗ No |
| OBS Studio | Free | App install + config | ✓ With plugin | ✓ With config |
Frequently Asked Questions
Does this work on macOS Sonoma and Sequoia?
Yes. The script uses PyQt5 which runs on macOS 12 and above, including Sonoma and Sequoia. The only thing that changes between versions is the camera permission dialog — macOS may ask for camera access for Terminal or your IDE on first run.
The window opens but shows a black circle — what's wrong?
This almost always means camera permissions weren't granted. Go to System Settings → Privacy & Security → Camera, and make sure Terminal (or VS Code, whichever you used to run the script) is toggled on. Then re-run the script.
How do I make the circle bigger or smaller?
Find the line self.size = 300 near the top of the script and change the number. 200 is a compact overlay, 400 is large. The circle, the crop, and the resize all use this single variable so everything scales together.
Will the circle show up in QuickTime screen recordings?
Yes. QuickTime records everything visible on screen. As long as the floating circle is visible before you start recording, it will be captured. The same is true for GoTelePrompt, OBS, and any other screen recorder.
Can I use this on Windows or Linux?
Yes, with minor adjustments. PyQt5 and OpenCV are cross-platform. The main difference is that camera permissions are not required on Windows. The script should run as-is on both platforms after installing the same two pip packages.
How do I close the overlay cleanly?
Switch back to your Terminal window and press Ctrl + C. This releases the webcam correctly so it's free for other apps. If you use Cmd + Q while the Python process is in focus, that also works.